 Backit Down
the file synchronizer
 Backit Down
The main window controls allow you to manage synchronization projects and virtual folders. From the main window you can start options dialog, run-synchronization dialog, media manager and folder rules testbed.

Command buttons panel is located unders the main menu of the program. Below there is a combobox with projects and the project buttons. Still below there are the controls to deal with the media and their linking to the projects.
Larger area of the window is split on two parts. Left one contains virtual folders' list and the right one - file selection rules controls.
When you are starting Backit Down for the first time, it will ask you which language to use. Besides that, a database for project data and program setup options storage will be created in your home directory.
Before all, you may wish to change program's global options. Click a correspondent button on the command panel for this.

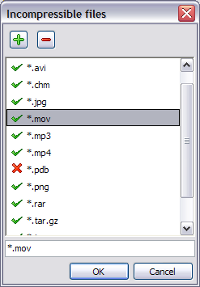
You'll need to modify list of the filemasks which must not be compressed while copying to the media. This list usually includes mediafiles: images, video, music; - or archives. These files are already compressed and frequently are too large by size. Compressing them more would make just waste of the time.
Click the button "Incompressible files" and modify the list as you wish.
For the synchronization to start you need to create a synchronization project first. Click the button "Add", enter name of the new project in the dialog which appears and close it clicking "OK" button.
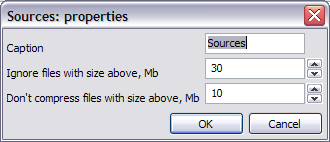
Freshly created project will be visible in the list now. Click "Options" button near the list. Project's options dialog is designed for you to change project's name, define maximum file size of the project and maximum size which still allows the file to be compressed. Zero value of the former option means that you define no size limits. Zero for the maximum file to be compressed means none of the files will be bzip2-compressed while copying to the medium.

Any branch of the filesystem which should be included to the project must have a correspondent virtual folder. Click the button "Add" in the project folders list, enter the name, click "OK". Folder's name must contain only characters allowed for filenames.
Newly created virtual folder must be linked to the real direcotry on this computer. Click the "Browse" button next to the field "Location on this computer". Select the directory and click "OK".
Now you should indicate which files must participate the synchronization. Use the folder rules list on the right. Every rule is a filemask. The icon on the left of an item tells the meaning of the rule: should the files subject to the mask be synchronized or ignored.
The order of the rules in the list does matter: the first rule apt for the file (looking from top downwards) will be applied. You can reorder the rules as you wish by the mean of buttons "Up" and "Down".
The last preparation task is to tell Backit in which directory the files of the project must be stored on the media. To fulfill this the medium must be linked to the project. If you have no media registered in Backit Down run the media manager. Otherwise select the medium in the list and enter the path till the folder where the project files will be stored (path from the root of the medium). You can also click the "Browse" button to select the directory in the directory selection dialog. But this option works only for the media currently connected to the computer.
Everything is now ready to run synchronization. Click the "Run" button on the command panel to open sync-running dialog.
This task is achiveable by the export/import database mechanizm (see the buttons "Export/import to/from XML"). Export button is responsible for database's export into an XML file which afterwards will be compressed and written to the root folder of every medium connected to the computer now. If you plugged the medium in after you had started Backit Down, click the "Refresh" button before the export.
The "Import from XML" button allows you to import projects' metadata from all connected media (assuming you have done the export on another computer). Only outdated records of the database are renewed or the absent ones added while the import. Projects, virtual folders, rules etc. are added or refreshed to correnspond the database from which the export has been done.
If virtual folders have been added on the first computer, you'll have to connect those to real folders on this one after importing metadata. If there is no link between a project (virtual) folder and the real one on current computer no files within the folder will be synchronized.
If you changed projects' properties and structure, added/removed projects you'll have to import projects database metainfo before the synchronization (see above). In case you didn't change anything within the projects to synchronize on other computer you need not make import.
You can also create the project to correspond the one on another computer from scratch but be sure to give the virtual folders same names(!) and try to reproduce the file selection rules. If you performed the import everything is simpler: just map new virtual folders of the projects to real directories.
There is a tool to manage Backit media: add, remove and remap them. It opens by clicking the "Manage media" button on the main window.
You can read more about the folder rules from this section of the help.
Before doing the synchronization it's strictly advices to check file selection rules in the folder rules testbed. Surely it's your option but only simple and clear rulesets may be used without a proper testing. Possible result of ignoring this approach is data lost.